DIY Panel Look Accent Wall
- Apr 30, 2022
- 4 min read
An accent wall is a timeless solution to bring some eye-catchiness to your space, to make it bolder and cooler and to change its whole look. Look no further than DIY faux paneling.

This DIY wall treatment gives depth to your space. You can install the look in squares (steps provided), forgo the horizontal pieces for uniform vertical slats, or even create a hotly trending geometric design. Make sure to check out our gallery of inspiration below!

STEP 1
Prep The Wall
To ensure tight joints where the vertical wood strips (stiles) and horizontal strips (rails) contact each other, the wall, and the existing trim, the wall needs to be flat. Check by using the edge of a level. Many walls bulge near corners or at the seams between drywall sheets. Use drywall compound and a wide drywall blade to fill dips and feather out bulges as best you can. Sand the dried compound for a smooth, mar-free surface. Check it with a strong side light that reveals any defects.

STEP 2
Choose Your Wood Choose straight, defect-free boards in affordable and tight-grain wood, such as alder, birch, or poplar. Pine will suffice, but its knots and pitch pockets might detract from the project's final appearance. The size of boards you choose will depend on the wall area you're planning to cover. Compare boards that are 1/2x1-1/2-inch, 1x3, and 1x4 to determine the best scale for your project.
Or, if you have access to a table saw and pickup truck, the ideal material for the rails and stiles is medium-density fiberboard (known as MDF), an inexpensive 4x8-foot sheet you cut into strips. It's heavy—about 70 pounds for a 3/4-inch-thick sheet—so you'll need a helper to handle it. MDF sands to a smooth and uniform surface that takes paint well, it has none of the defects (such as knots) that can show up in natural-wood boards, and it flexes slightly to conform to minor wall irregularities.

STEP 3
Lay Out The Strips If you've installed a tile floor, you're already familiar with the basic process for laying out the positions of the wood strips. But unlike floor tiles, here you get to choose any size "square" (the wall area between the rails and stiles) that suits your fancy. To do that, first mark the positions of wood trim pieces (of the same width as the rails and stiles) that form a border around the wall perimeter. Use a soft felt-tip marker to avoid putting any indentations in the drywall the way a pencil or pen might.
Measure from the top of the bottom trim position to the bottom of the top trim position, as well as the distance between the side trim. Mark vertical and horizontal centerlines.
Decide on a size for your squares that leaves you a full (or near-full) square at all edges. Also, choose a square size that appears correctly scaled for the size of your wall. Like the grout lines between ceramic tiles, you should have either a rail that is centered between the floor and ceiling or two rails positioned an equal distance on either side of center. The same goes for positioning the center stile(s) between the side walls. You might want to plot the rail and stile positions on graph paper, or use a computer program if that's more your style.
Once you have a good idea of where the rails and stiles will go, mark their positions on the wall. Make sure the rail marks are level, the stiles are plumb, and that they meet each other at 90 degrees (check with a framing square). If your layout doesn't work, just apply primer over the marks and try again. Finally, use a stud finder to mark the wall studs (in a color different than used for the border/rail/stile positions) so you'll know where to drive fasteners later.

STEP 4
Attach The Strips
Attach the border trim first, measuring and cutting carefully for a tight fit where the pieces meet. Apply construction adhesive to the backs of these pieces, and attach them by driving finish nails at least 2-1/2 inches long into studs. Since you'll be painting the rails, stiles, and walls later, you might be tempted to fill bad joints with caulk, but avoid relying on such fillers: Those caulked areas will show up even after you apply paint, and will only become more visible over time.
To ensure tight joints, it's a good idea to initially cut each piece a fraction of an inch long so you can check its length on the wall and "sneak up" on the final cut with a series of fine cuts. Even then, leave the piece just a hair long after the final cut; this allows you to flex the piece outward to fit it into position, forcibly press it flat against the wall, and force its ends tight against adjoining pieces. Measure and mark odd angles (other than 90 degrees) using an adjustable bevel to transfer the angle from the wall to the piece you're about to cut. If you have to drive a nail closer than an inch from an end or edge, predrill a hole for the nail to avoid splitting the wood or MDF.
Next, attach a center stile. It might not fall on a stud, so attach it with construction adhesive only, using painter's tape to temporarily hold the stile in position. After the construction adhesive cures, add the center rail on both sides of it. Attach the remaining rails and stiles, working out from the center.

STEP 5
Paint And Finish
Prime the wall, border pieces, rails, and stiles. Caulk any small gaps with paintable silicone before adding a top coat of latex paint. Let dry completely.
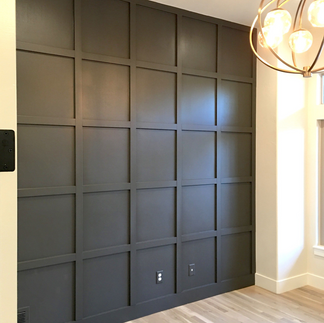
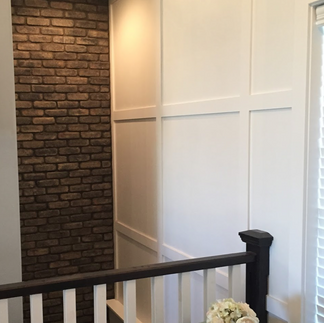
GALLERY OF INSPIRATION